
By Francisco Dean
In this 3-part series, Francisco Dean, a high school music teacher at the University of Chicago Laboratory Schools, talks about the merits of music technology offerings as a means to reach students that would otherwise not pass through the doors of a music classroom and how offerings like this add valuable diversity to school music departments in general. Part One: Who, What, Why (Fall 2019 issue) explored the rationale behind the addition of a digital music offering. Here in Part Two, he’ll show you the ropes of planning for and starting a digital music program. Part Three will focus on curriculum, with ideas for scope-and-sequence, abundant resources for support and next steps to take an established digital music program even deeper.
After talking about rationale in the first installment (Fall 2019), let’s get into the nuts and bolts. The world of digital music uses terms and equipment that can sound intimidating. First, I’ll demystify the jargon, explain what each piece of equipment is used for, and give you ideas on how to build a teaching space for the magic to happen. Let’s meet the team:
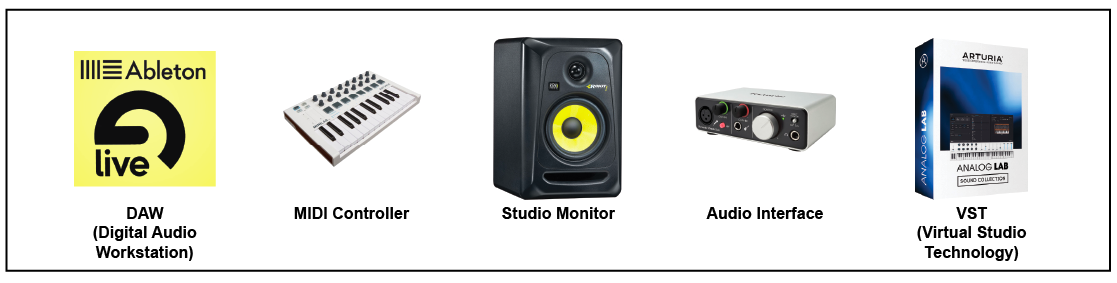
DAW (Digital Audio Workstation)
This is just a fancy name for software used to create music. Some well-known brands are Ableton, Garage Band, Logic, FL Studio and Cubase. Educational discounts are available, but in Ableton’s case, a free lite version of the software is included with the purchase of several brands of MIDI controllers (Akai, Arturia, Novation, M-Audio, Alesis and Korg, for example). You’ll need a MIDI controller anyway, so you may as well get the DAW for free!
MIDI Controller
MIDI is short for Musical Instrument Digital Interface - music data that a computer can understand. Knowing the intricacies of MIDI itself is not necessary, you just need to know that a MIDI controller is the instrument used to play the music into the computer. Controllers are a matter of preference, with hundreds to choose from. The brands mentioned above come with a free copy of the DAW Ableton Live Lite, and some even come with free extra instrument sounds (VST’s). When deciding on how many octaves you want your controller to have, keep in mind all controllers (regardless of size/brand/model) have access to the full 88-key range of a traditional piano. Smaller controllers access the higher and lower octaves through included octave buttons. I recommend getting a controller that includes drum pads; your students will appreciate that feature. Prices for a basic keyboard-only controller starts around $50, with a feature-stocked controller (keyboard, drum pads, knobs, etc.) starting at just under $100.
Studio Monitors
In digital music, the term monitor has two definitions. One is a computer screen and the other refers to the speakers that are connected to your studio so sound can be heard. Choosing studio monitors can feel daunting, but if you’re just starting off and are budget-minded, you’ll find plenty that are simple and will get the job done well. Decide how you intend to set your classroom up before deciding on speakers. If going with a single pair of speakers for the entire room, go for speakers that are a little bigger (8”). If going with a pair of speakers for each student station, smaller (5” - 6”) are better. When you’re ready to buy, be careful to confirm whether the price you see is for a single speaker, or for a pair - they can be listed both ways.
Audio Interface
This is a small external device that is needed to allow you to connect a microphone (for voice or acoustic instruments) or an instrument cable (for guitars or external keyboards) to the computer so that these sounds/instruments can be recorded into the DAW. Realistically, one mic input and one instrument input will suffice, but it is nice having two inputs for each; two mics allows you to make a stereo recording or record two performers, and two instrument inputs allows two guitarists to record together. Some interfaces come bundled with a mic and headphones (like the Focusrite Scarlett Studio series, for example) to make your budget stretch even further!
VST (Virtual Studio Technology)
VST is really just “software with additional cool instrument sounds.” We also call them plugins because they are from 3rd party sources and are installed (virtually plugged in) to the DAW. MIDI controller brands such as Akai and Arturia include great sounding VST’s for free with their products.
YOU DON’T NEED NASA
Getting up and running doesn’t require everything plus the kitchen sink. The bare essential set-up includes some equipment that most of us already use in our classrooms on a regular basis, and great music can be created with just these four things:
Computer
Speakers and/or Headphones
A MIDI controller
DAW software
If you’re starting from scratch, don’t forget that Ableton can come as a free, lite version that is fully functional when you buy your MIDI controller (reference the DAW section earlier on the opposite page). Your school may already have computers and headphones, so a MIDI controller may be all you need to purchase!
A logical next piece of equipment to add is one that allows you to record vocals or live instruments into your digital music projects - the audio interface. An audio interface allows you to connect a traditional mic to your computer (or connect an electric guitar or bass), but if all you’re needing is a way to connect a microphone, this interface can be skipped in favor of buying a USB microphone. I used to balk at USB mics because the quality was nowhere near that of a traditional mic, but this is no longer the case! USB mics have improved in quality tremendously and entry-level ones can be very reasonably priced (a Samson Go Mic is a great sounding USB mic that fits in your pocket and only costs $30!).
In truth, anything else in terms of gear is cool stuff that will enhance your students’ experience, but not at all needed to get started creating great music.
CLASSROOM SET-UP (TWO OPTIONS)
Last but not least for this installment - setting up the room. There are many ways you can choose to set up your physical space, but in general, the ways we choose to hear sounds in the room can be reduced to two options. I’ll discuss the advantages of both, as well as things to be mindful of for each scenario.
Open audio is a term I use to describe audio the entire class can hear through one set of speakers (in addition to listening through the headphones at each station). It allows the teacher to play audio examples the entire class can hear together, and individual students can Show and Tell their projects so that all can learn from each other’s ideas and celebrate each other’s work. No matter how you set your room up, you’ll want an open audio option from time to time.
Classroom Set-up Option #1: Single Audio Source
Audio from each station is routed to a mixer at the teacher’s station and fed to one pair of main classroom speakers (either at the teacher’s station or at front of the room on wall).

Advantages of this set-up:
Economical (only one pair of speakers are needed for the entire room)
Gives the teacher complete control over the open audio in the room.
Things to be mindful of:
Limits the ability of students to hear open audio if they want to come in and work on their own outside of class times
Requires teacher to have basic understanding of a mixer (which is easy to learn)
Presents the negative potential for students to need to operate equipment at teacher station and inadvertently mess up teacher settings
More wires!
Classroom Set-up Option #2: Multiple Open Sources
Each station has it’s own set of speakers at the computer

Advantages of this set-up:
Each station can control their own open audio independently
Doesn’t require additional knowledge of audio routing or understanding of a mixer
Students can operate their own station and do not need to tamper with teacher hub during demonstrations
Fewer wires! Nice and tidy
Models a personal studio set-up and shows students what they can do to build their own home studio
Things to be mindful of:
It will cost more money as each station requires its own set of speakers
Audio etiquette needs to be established and maintained in the room as students have complete control of their open audio
RESOURCES FOR THE EQUIPMENT
Like all of us in education, I always need to be budget-conscious with my program. Combine that with a lack of knowledge about digital music when I started 10 years ago, it was hard knowing where to begin and how to begin.
In regards to DAW, no other company has created a superb product for it’s mainstream industry consumers, while also making enormous investments in K-12 teachers and their classrooms across the country than Ableton Live (I am not endorsed by the company, just a huge fan of their products and work). The software is incredibly user-friendly and the embedded hands-on tutorials assume no prior experience. Ableton also has a feature called Info View that literally gives an explanation of anything your mouse hovers over - all of those knobs, buttons and windows are no longer a mystery to the beginner. Ableton has also partnered with just about every leading manufacturer of MIDI controllers and audio interfaces to bundle a free fully-functioning lite version of their software. The company also recently championed an initiative that equipped music teachers and their schools with free MIDI controllers and software in 30 countries across five continents. Even without buying their product, Ableton’s website has free online hands-on interactive modules for learning the fundamentals of music making and even learning how to build synthesizer sounds from scratch right from your browser.
In terms of the other pieces of equipment, several retail companies not only offer competitive school pricing for what you need, but also offer consultation before buying anything and exceptional support after making those purchases. Guitar Center’s GC Pro program, B&H Photo’s audio gear line, Sweetwater and Romero Music are great places to begin your search.
It is my hope that getting a sense of the gear and room set-up options has helped you think about how this will translate to your specific resources, budget and physical spaces as you build programs to bring more students into music education programs.

Francisco Dean is in his 10th year as a member of the Lab School faculty and 23rd year overall teaching. He holds a Bachelor’s Degree in Music Education from Southwest Texas State University and a Masters in Jazz Studies from Indiana University. At the Lab School, he heads the high school jazz ensemble and music technology course offerings, which include two levels of digital music composition as well as a class for studio recording and mixing. You can reach out to him at [email protected].